

ALL ABOUT TRACK & FIELD SPIKES & HOW TO PURCHASE THEM
What are Running Spikes?
Most of us think of “spikes” or “pins” as the metal, or composite, components with a threading, which are screwed in at the bottom of shoes used for track and field events. However, they can also make reference to the whole shoe itself.
The first running spike was invented by Joseph William Foster in the 1890’s and expanded upon by the founder of Adidas, Adolf Dassler.
Depending upon which event you compete in, there is a particular shoe for that event, based on the physical demands placed on the foot during that event.
Sprinter’s “spikes” have the least weight to them, often weighing in at only a few ounces. Other shoes, such as for javelin, are more robust and tend to be a bit heavier
There are several major manufacturers of running spikes, they include, but are not limited to: Asics, Adidas, Brooks, Mizuno, New Balance, Nike, Puma, Reebok and Saucony.
Why use Running Spikes?
Running in spikes can improve your times via providing support, traction and minimal weight.
HOW TO PURCHASE “SPIKES”
Having the wrong spike can hinder your performance and even possibly lead to injury. Therefore, here are a few guidelines to help you find your perfect pair spikes:
– It is a good idea to purchase 2 pairs of spikes. One pair, usually a more inexpensive shoe, should be used for daily training; while the more expensive pair should be transitioned into use as your competitions are approaching. Some would even argue, that a third pair should be purchased, as a back-up to the spikes used for competition.
– The first criterion is usually lightness. For some, this is second and the brand name is first.
– The second criterion is flexibility of the plate. If a spike is too stiff, it will not allow for the small idiosyncratic movements each bone of the foot makes to assist in buffering the ground forces. Thus transferring the forces to the Achilles and / or the knee, or even further up, the hip and lower back.
– The third criterion is the angle of the footplate. Too steep of an angle and it will result in a loss of power upon foot strike. Too shallow of a footplate, and there will be too much stress placed on the foot / ankle / Achilles. If you find the second and third criterion compromised in a pair of sprint spikes, my advice is to look at another shoe.
– Typically, some individuals purchase spikes half a size smaller. Even if you want it to ‘fit like a glove’, MAKE SURE YOU CAN DORSIFLEX YOUR TOES, ESPECIALLY THE BIG TOE. THIS WILL ENCOURAGE PROPER ANKLE STABILITY PRIOR TO FOOT STRIKE.
– The uppers on good spikes will ‘give in’ a little as you start to use them. Therefore, if you can wiggle your toes while you are weight bearing, this will ensure the spikes fit comfortably and not too tight. There is very little ‘break-in’ time with spikes. It should feel good when you put it on and start to weight bear. Furthermore, you should go for a quick stride or practice your throwing/jumping technique, thus giving you a better feel of how the shoe will perform during your competition / training. Doing this will validate your purchasing decision.
– Some athletes do not wear any socks while wearing spikes, having said that, if you do wear socks, make sure you bring the socks you train in and compete in when you try on the spikes.
– Try the spikes on later in the day or after a workout, as your feet will swell in both scenarios.
– Make sure you trim your toenails, and address any blisters or other foot issues, before you try on the spikes.
– Remember to bring your orthotics, if you wear them, as this will definitely affect your sizing.
– Purchasing spikes online can be quick and convenient. However, you should be aware of a few more tips if you are inclined to go this route. Try the identical pair at a local store or find something similar. Another option is to measure your feet from heel to the edge of your longest toe. Most spike manufactures have all their sizing in centimeters as well as traditional shoe sizes.
If you purchase a pair of spikes online, do your due diligence to see if you can return your purchase, just incase they do not fit, or if there is any other issue with them (i.e. wrong colors, style or manufactures defect).
VARIOUS TYPES OF SPIKES
There are several options when it comes to spike technology, some of which I have mentioned earlier. Spikes vary from event to event in track and field. For example, sprint and distance spikes differ in the thickness of the heel plate and angle of the shoe. Because sprinters spend most of their time on the balls of their feet, for this reason, sprint spikes are more angled from the footplate to the heel. Do not use sprint spikes for distance events and vice versa, as they are bio-mechanically designed to maintain ideal foot position for each of the respective events.
SPRINT SPIKES
As mentioned earlier, Sprinting means running on the balls of your feet and not on the mid-foot, as it is done in mid to long distance events. Sprinting with the mid-foot dropping will not generate the force required for maximum velocity. Having alluded to this, if a novice trains in this manner, the athlete could potentially generate too much repetitive stress on their body, which may lead to injuries (i.e. Achilles issues, ankle / knee / hip instability just to mention a few).
Sprinter’s spikes (i.e. up to 400m) are the lightest track spikes compared to other type of spikes. There is usually no padding on the heel to cut down on the weight, as well improve functionality.
The spike plate should be ‘stiff’ and yet flexible enough to help keep the foot dorsiflexed (i.e. keep you running on the balls of your feet).
Some sprint spikes have zip up fronts as well as laces. This could possiblly aid in ‘better aerodynamics’, although, I am not totally convinced that it will lower your times as much as it will make your spike attire more pleasing to onlookers.
MIDDLE DISTANCE SPIKES
Mid distance spikes are similar to sprint spikes, but also come with a small heel cushion. This is to accommodate for more mid-foot ground forces as a result of the slower speeds mid distance runners move at.
They are generally a little heavier than sprint spikes, but still maintain a semi-rigid spike plate, as a majority of the running is done with the fore foot making contact with the ground.
Overall, mid distance spikes are similar to their sprint counter part, with the exception of a heel cushion and a semi-rigid spike plate.
LONG DISTANCE SPIKES (LDS)
LDS have more cushioning compared to mid distance spikes. The shoes tend to be more flat, with minimal rigidity, and are generally heavier than their mid distance counterparts.
If your 100m times are between 18-20 sec. during your competitions, than these spikes are your match.
Events such as the Steeplechase, where the athletes are required to jump over water hazards, require the shoe have a good drainage system in the uppers and soles of the shoe, to allow for water to drain out.
Cross-country spikes are sturdier than other spikes and have much better traction in the form of spikes on the soles as well as the sides of the sole.
These spikes can also be used for training on slower days, where the athlete would benefit from a bit of support and light weight.
Overall, Long distance shoes have more cushioning, are flat, and heavier than other spikes, but weigh less than regular running flats.
THROWING SHOES
Throwing shoes are a class of footwear built for, as the name implies, “throwing.” Whether it is a shot, hammer, discus or javelin, these shoes are similar, with the exception of the javelin shoe, as these shoes have spikes.
Throwing shoes are flexible with a wide, flat-bottom sole.
They tend to fit snug, with a little wiggle room, due to the large vectorial forces generated during these events.
– Hammer Throw:
The sole of this shoe is smooth, and allows for greater contact with the side edges. A definite requirement when rotating at high velocities.
– Discus and Shot:
In this shoe, the roundness of the heel is not as important, as the throwing action is done on the forefoot.
The sole is composed of a tackier surface and is flat with a wide base.
– Glide Shot:
This shoe is slightly curved with a broad, flat heel. This gives the athlete better lateral support and makes it more feasible to position the heel against the back of the throwing area.
Javelin:
Javelin shoes, a.k.a boots, are, as the name implies, either resembling a shoe or a boot (i.e. low – mid – high cut).
Due to the forces placed on the ankle and foot during a throw, the shoe provides excellent support around these joints.
Javelin shoes come with 11 spikes, usually much longer than the ones used for sprinting, however they should not exceed 12 mm in length. The placement of the spikes usually follows this pattern – seven in the forefoot and four at the heel.
Some manufactures alter the supportive elements of the shoe to factor in the different forces acting on each foot. They do this by placing additional strapping material around the ankle. A good example of this is the ASICS Javelin shoe.
Jumping Shoes:
Much like other spikes, jumpers require spikes for better take-off stability, as well as more padding in the heels.
Shoes for the triple jump, long jump and pole vault are similar.
Jumpers’ shoes are flexible enough to allow for the sprint down the runway, yet rigid enough for the take-off.
Typically there are 6 to 8 spikes on the sole of the shoe. In the triple jumpers shoe, the spike pattern is similar to that of the javelin shoe (i.e. the shoe has spikes on the fore foot as well as the rear foot).
IAAF has ruled that the triple jumpers sole can not be greater than 19mm in thickness.
Pole vaulting shoes have an 8mm heel-to-toe offset to enhance the transition from sprinting to vaulting.
POSITIONING OF SPIKES ON THE SOLE OF THE SHOE
Earlier spike designs only accommodated 6 pins per shoe, due to IAAF rules. Since the 90’s the rules have changed to allow for a greater number of spikes, up to 8 per shoe. The 8 pin shoes are made to maximize ground contact with your toes as long as possible, as well as increase force output. However, as mentioned earlier, in my opinion, having a greater number of pins can interfere with ideal individual foot bio-mechanics responsible for buffering ground reaction forces.
Actual spike placement patterns vary from different spike manufactures. We recommend that the actual spikes be placed on the outside toes and ball of the foot. Minimal spikes that are strategically set on the footplate are better than too many spikes placed incorrectly. One of the lightest commercial spikes on the market to date, is the ASICS JAPAN LIGHTING, which incidentally has only 6 pins, and is an example of optimal design and correct spike placement.
Some 200m and 400m sprinters place their spikes asymmetrically on the left and right shoe to allow for better bend running. However, inserting pins on the inside of the left shoe (i.e. under the big toe), and on the outside of right shoe (i.e. under the baby toe), will counter the clockwise centripetal force as you negotiate the bends at maximum velocity. The placement of spikes in the aforementioned manner could just be a personal preference.
Along the same lines of spike placement, some manufactures have redesigned the uppers on the right shoe, with extra reinforced material or strap to accommodate for additional centrifugal force placed on the outside spike when running the bend.
Permanent pins can be an issue if you are running on track and field facilities that do not allow for spikes you currently have on your shoe, either because the pins are too long or the wrong type. This being said, it is perhaps not a wise decision to purchase such shoes.
Some sprint coaches would suggest mid distance spikes for novice athletes, until they develop superior foot and ankle strength to maintain the upright position required for speed work. Despite mid distance spikes being a tad heavier, they will provide the athlete with a bit more support as they transition into lighter spikes.
SHAPE & LENGTH VARIATIONS OF SPIKE PINS
As a general rule of thumb, it is a good idea to replace your spikes every year prior to your competition season. Some athletes replace their spikes several times in the year, depending upon usage. Do not procrastinate when you start to see your spikes wear down to “stubs,” as this will make it tedious when it comes time to remove the old worn out spikes.
There are generally 3 criteria when choosing Spikes:
1) The Shape of the Spikes
2) The Length of the Spikes and
3) The Material of the Spikes are Composed of
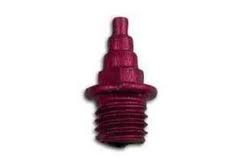
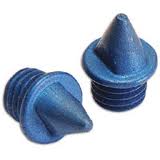
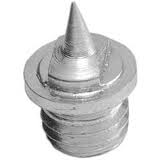
1) Spikes come in 4 shapes:
A) Christmas Tree (also known as compression tier spikes)
B) Pyramid
C) Needles / Pins
D) Tartan spikes (a cross between Needle spikes and Pyramid spikes).

A) Christmas Tree spikes:
Christmas Tree spikes are becoming more and more common. Their shape resembles a “Christmas Tree,” hence the name. They are a unique compilation between a Pyramid spike and Needle spikes, minus the sharp point.
These spikes are composed of 2 progressively smaller round ridges, on a base resembling the Pyramid spike. The round ridges grip in a variety of vectorial directions upon foot strike and do not “puncture” the track, but rather compress the track surface, thus returning the ground reaction force back into the next stride (i.e. giving you more “bounce”). Having said this, these spikes are particularly advantageous for hurdlers, whose foot strike is not always as ‘consistent’ as a sprinters.
Many athletes say that this is their “spike of choice” for use on Mondo type track surfaces. However, one should always refer to the facility rules / meet rules to see if these spikes are permissible. Some facilities do not like these spikes, as they feel they tend to ‘chew-up’ the track.
B) Pyramid Spikes:
Pyramid spikes are primarily used for cross-country races on dirt and grass. However, many sprinters will use pyramid spikes if needle spikes are not permissible.
Pyramid spikes do not exhibit much wear and tear and are preferred for indoor track surfaces, as they are less destructive.
They do not have a good “bounce”, as do the Christmas Tree spikes, but they are better in this regard than Needle spikes.
C) Pin / Needle Spikes:
Pins / Needles are synonymous with the word “spike”, as they most often have a pointed tip. They are similar to a Pyramid spike, but with a thinner neck.
They tend to penetrate into track surfaces better than the previous two types of spikes. As a consequence of this feature, they tend to “stick” into the track, thus potentially slowing the athlete down.
They tend to be used more so on all-weather tracks, as these track surfaces require more traction.
D) Tartan Spikes:
Tartan spikes are dull needle spikes, which resemble a cross between Needle spikes and Pyramid spikes. They are used primarily on selected rubber track surfaces. They are less “aggressive” than Needle spikes, but still possess good track penetration.
2) The Length of the Spikes:
Spikes come in various lengths to accommodate personal preference and / or track surfaces. The most common lengths are 5mm, 7mm, 9mm and 13mm (usually for Javelin throwers).
Traditionally, the maximum allowable spike length for outdoor tracks is 7mm, and 5mm for indoor tracks.
3) The Material the Spikes are Composed of:
Spikes are either made of steel, ceramic or titanium alloy. Ceramic Pins are durable spikes that are 1/3 the weight of traditional steel spikes, as well as abrasion-resistant. Titanium alloy is in the same class as Ceramic pins, but perhaps a little bit lighter. Most amateurs will benefit from either of these options. Remember; lighter also means more cost and more wear and tear on the spike.
HERE ARE SOME TIPS FOR USING SPIKES AT A TRACK MEET
Always check days, if not weeks, with the race organizers before your event, regarding permissible spike configurations, lengths and shapes used on the track you will be competing on. Having said this, always bring a few different types of spikes just incase things change for whatever reason.
If you need to do a quick change of spikes, it’s a good idea to purchase a good quality “RATCHET SPIKE WRENCH” from www.everythingtrackandfield.com. This will make changing spikes a snap. Most spike wrenches that come with your shoe purchase are made of cheap soft quality metal that tend to lose their gripping ability after a few uses. It is also good preparation to carry a set of needle nose pliers, just in case you strip the spike. Another option is to have a second pair of race spikes ready to go, as you never know what could happen. Be prepared for the unexpected.
If possible, always arrive a few days before a competition and check out the track surface. Upon arrival at the track, check the surface of the track. If possible, do a warm up on the track to gauge the recoil and / or hardness of the track surface. 786